Integrate Swagger with Identity Server 4 (.NET Core 3.1)
While building API in microservices architecture, the best way to create clear documentation with a friendly GUI is Swagger, which also allows execution of API tests. Running Swagger with API is quite easy and well-documented, but when API is protected by OAuth, it can be tricky to integrate them. In this article, I’d like to show you how to run a sample .NET Core 3.1 API with Swagger (Swashbuckle for .NET) and Swagger Authroziation via Identity Server 4.
1. Add Swagger to ASP .NET Core project
First, we need to install a nuget package via Package Manager Console
Install-Package Swashbuckle.AspNetCore
After doing that, go to Startup.cs file and change ConfigureServices method, so it looks like below:
public void ConfigureServices(IServiceCollection services)
{
    services.AddControllers();
    services.AddSwaggerGen(c =>
    {
        c.SwaggerDoc("v1", new OpenApiInfo { Title = "My API", Version = "v1" });
    });
}
Then, change Configure method as follows:
public void Configure(IApplicationBuilder app)
{
    app.UseSwagger();
    app.UseSwaggerUI(c =>
    {
        c.SwaggerEndpoint("/swagger/v1/swagger.json", "My API V1");
    });
    app.UseEndpoints(endpoints =>
    {
        endpoints.MapControllers();
    });
    app.UseRouting();
}
And, basicly, this is all you have to do to configure Swagger with minumum parameters.
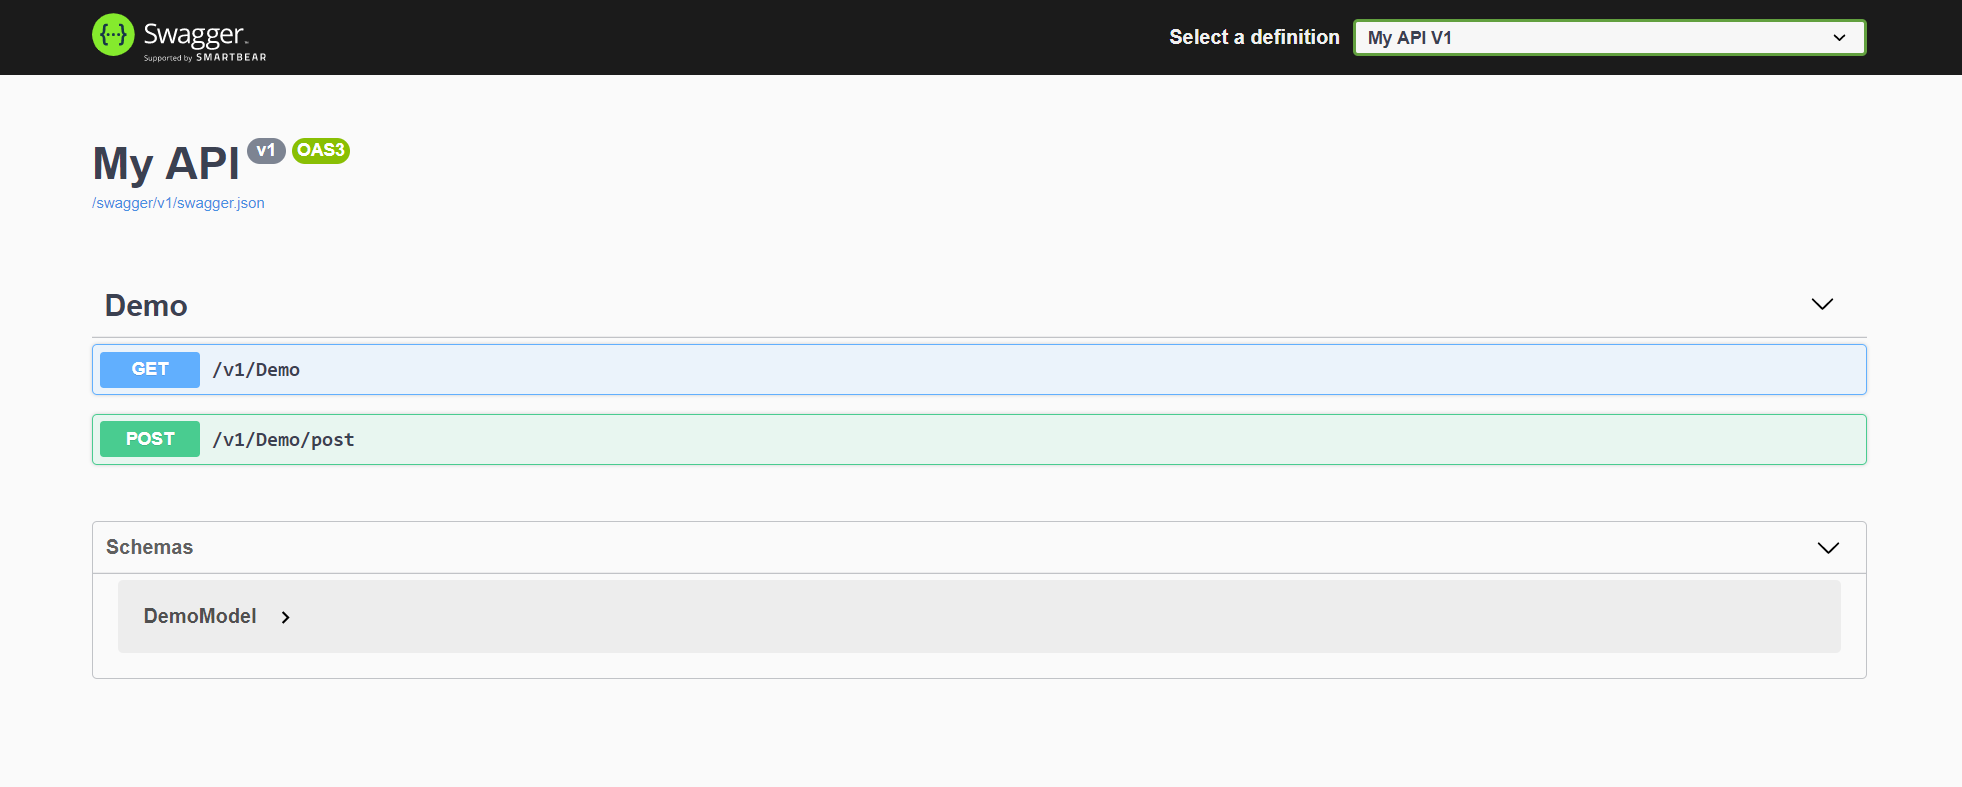
To see the results of Swagger’s work, we need to add Controller and Model:
[Route("v1/[controller]")]
[ApiController]
public class DemoController : ControllerBase
{
    [HttpGet]
    public IActionResult GetDemoValues()
        => Ok(new string[] { "value1", "value2" });

    [HttpPost]
    [Route("post")]
    public IActionResult PostDemoModel(DemoModel model)
        => Ok(model);
    }
public class DemoModel
{
    public Guid Id { get; set; } = Guid.NewGuid();
    public string Name { get; set; }
}
Before we run our application, we can go to launchSettings.json file and change launchUrl to swagger
"launchUrl": "swagger",
Now, we can run our demo API and see the results.
2. Protect our API using IdentityServer
First, we need to install IdentityServer4 library:
Install-Package IdentityServer4.AccessTokenValidation
Then, we have to add a new private method in Startup.cs to register the authentication server.
protected void ConfigureAuth(IServiceCollection services)
{
    services.AddAuthentication(IdentityServerAuthenticationDefaults.AuthenticationScheme)
        .AddIdentityServerAuthentication(options =>
        {
            options.Authority = "http://localhost:44333";  // identity server endpoint
            options.ApiName = "demo-test-api-scope";
            options.RequireHttpsMetadata = false; // this should be true on production
        });
}
and call ConfigureAuth private method in ConfigureServices method
 public void ConfigureServices(IServiceCollection services)
{
    services.AddControllers();
    ConfigureAuth(services);
    services.AddSwaggerGen(c =>
    {
        c.SwaggerDoc("v1", new OpenApiInfo { Title = "My API", Version = "v1" });
    });
}
next, change Configure method and add one more line with app.UseAuthentication();
public void Configure(IApplicationBuilder app)
{
    app.UseAuthentication();
...
Having all the above set up in Startup.cs file, the next step is to decide which Controllers or Actions will be protected by authorization. To do that, we can add a global authorization filter. Thanks to the filter, there’s no need to add the authorization attributes one-by-one. Adding filters to all actions / controllers by default, is a better approach, as there’s no need to remember to add [Authorization] attribute at every new action / controller.
To add the gloabl authorization filter we have to add the call of AddMvc inside of the ConfigureServices method in Startup.cs
public void ConfigureServices(IServiceCollection services)
{
    services.AddMvc(options =>
    {
        options.Filters.Add(new AuthorizeFilter(new AuthorizationPolicyBuilder()
            .RequireAuthenticatedUser()
            .AddAuthenticationSchemes(IdentityServerAuthenticationDefaults.AuthenticationScheme)
            .Build()));
    });
...
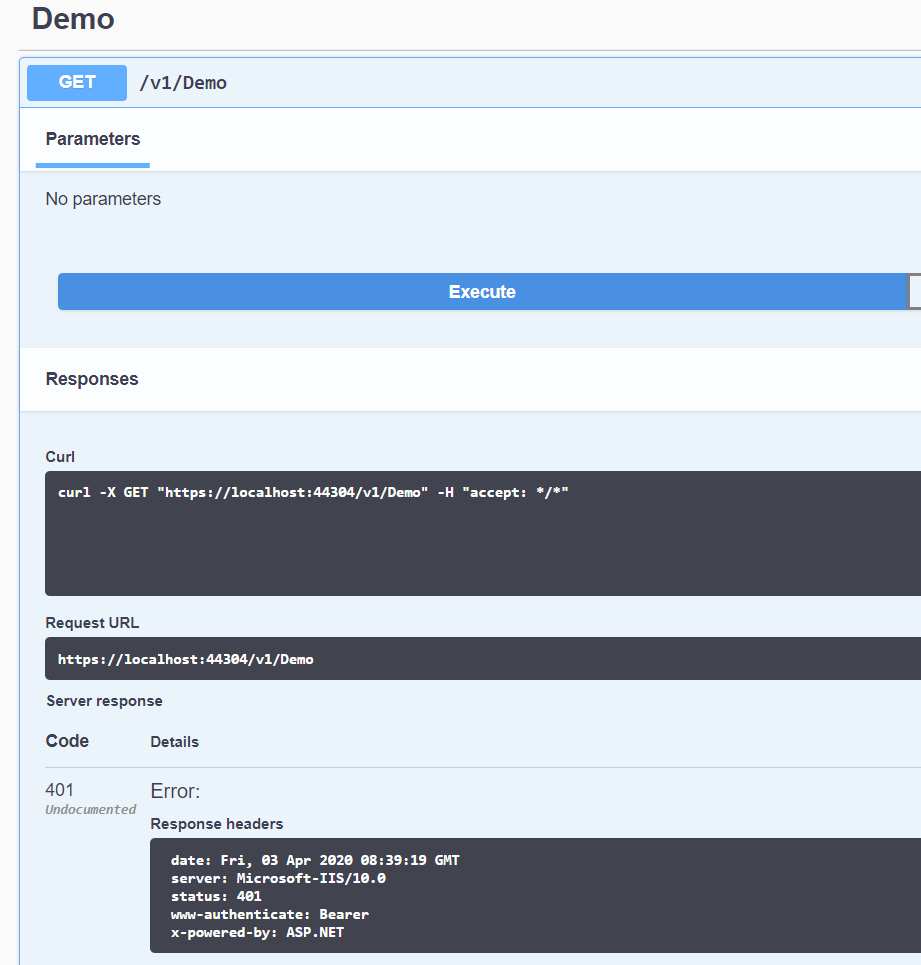
Now, as we compile and run our API and try to call actions from Swagger, we receive 401 status code
3. IdentityServer configuration
Let’s assume we have IdentityServer project set up. Then, we add a new client configuration for Swagger UI. It should look like this:
new Client
{
    ClientId = "mvc-test-api-swagger-app",
    ClientName = "Mvc test API Swagger APP",
    RequireClientSecret = false,
    RequireConsent = false,
    AllowAccessTokensViaBrowser = true,
    AllowedGrantTypes = GrantTypes.ImplicitAndClientCredentials,
    RedirectUris =
    {
        "http://localhost:44304/swagger/oauth2-redirect.html",
        "https://localhost:44304/swagger/oauth2-redirect.html"
    },
    PostLogoutRedirectUris =
    {
        "http://localhost:44304/swagger/index.html",
        "https://localhost:44304/swagger/index.html"
    },
    AllowedScopes =
    {
        "demo-test-api-scope"
    },
}
4. Dealing with Swagger UI authentitaction via Identity Server
At this point, we should modify the previous setup of Swagger in Startup.cs. But first, let’s add more libraries
Install-Package Swashbuckle.AspNetCore
Install-Package Swashbuckle.AspNetCore.Swagger
Then, we go to Startup.cs and change call method AddSwaggerGen in ConfigureServices method as follows:
...
services.AddSwaggerGen(c =>
{
    c.SwaggerDoc("v1", new OpenApiInfo { Title = "My API", Version = "v1" });
    c.AddSecurityDefinition(SecuritySchemeType.OAuth2.ToString(), new OpenApiSecurityScheme
    {
        Type = SecuritySchemeType.OAuth2,
        Flows = new OpenApiOAuthFlows
        {
            Implicit = new OpenApiOAuthFlow
            {
                AuthorizationUrl = new Uri("http://localhost:44333/connect/authorize"),
                Scopes = new Dictionary<string, string>()
                {
                    {
                        "demo-test-api-scope", "Demo API Swagger Auth Example"
                    }
                },
            }
        }
    });
});
Swagger UI is running in the user browser, so we have to use the implicit flow. Next, we set up ConfigureOAuth2 in Swagger UI configuration and add one line in UseSwaggerUI call method in Startup.cs Configure:
public void Configure(IApplicationBuilder app)
{
    app.UseAuthentication();
    app.UseSwagger();
    app.UseSwaggerUI(c =>
    {
        c.SwaggerEndpoint("/swagger/v1/swagger.json", "My API V1");
        c.OAuthClientId("mvc-test-api-swagger-app"); // this is a ClientId from IdentityServer configuration
    });
...
Now, we append OAuth2 requirements to all actions that have Authorize attribute. And then, we create new class AuthorizeCheckOperationFilter.cs and paste the following code:
public class AuthorizeCheckOperationFilter : IOperationFilter
{
    public void Apply(OpenApiOperation operation, OperationFilterContext context)
    {
        var allowAnonymous = context.MethodInfo
            .GetCustomAttributes(true)
            .OfType<AllowAnonymousAttribute>()
            .Distinct();

        if (allowAnonymous.Any())
            return;

        operation.Responses.Add("401", new OpenApiResponse { Description = "Unauthorized" });
        operation.Responses.Add("403", new OpenApiResponse { Description = "Forbidden" });
        var oAuthScheme = new OpenApiSecurityScheme
        {
            Reference = new OpenApiReference { Type = ReferenceType.SecurityScheme, Id = "oauth2" }
        };
        operation.Security = new List<OpenApiSecurityRequirement>
        {
            new OpenApiSecurityRequirement
            {
                [ oAuthScheme ] = new[] { "demo-test-api-scope" }
            }
        };
    }
}
Finally, we register operation filter in AddSwaggerGen method in Startup.cs
public void ConfigureServices(IServiceCollection services)
{
    ...

  services.AddSwaggerGen(c =>
  {
     ...

      c.OperationFilter<AuthorizeCheckOperationFilter>();

...
Let’s check how it works
Ok, now you can run our API, and go to /swagger/index.html. You should see an Authorize button at the top right. Click it. A modal pop-up will open.
It should look like this:
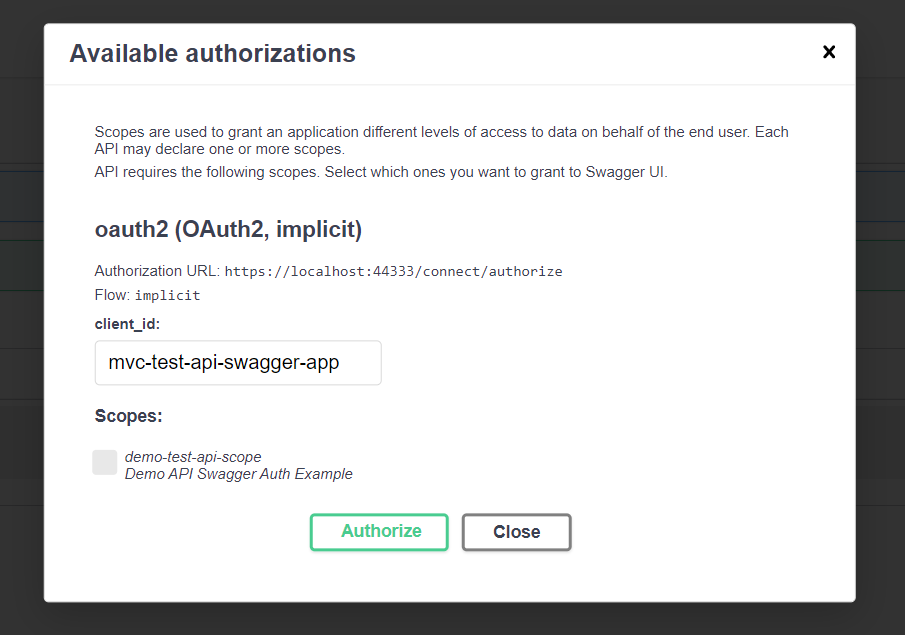
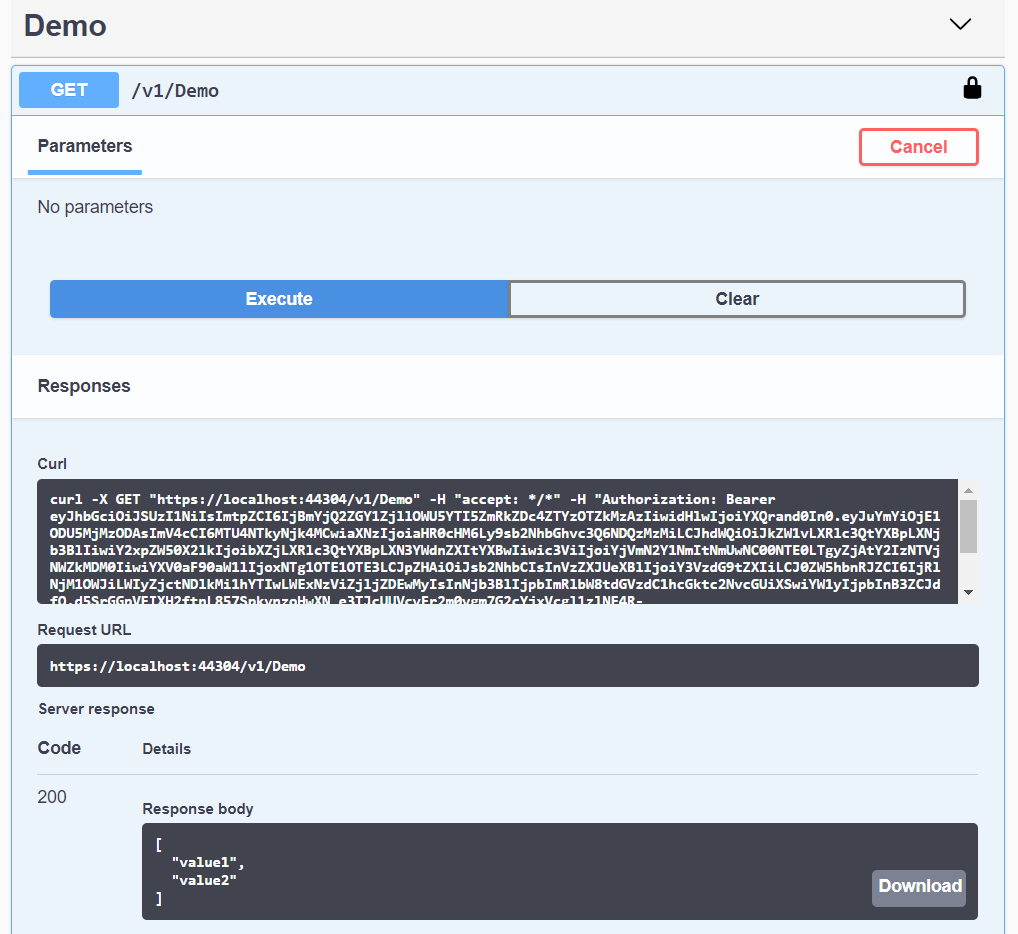
Now, click Authorize button (remember to check the scope box). Swagger will open a new tab with your IdentityServer app. After you authorize your account successfully, you will be redirected to our API. From this point, you will be able to test controllers’ actions with Authorize attribute.
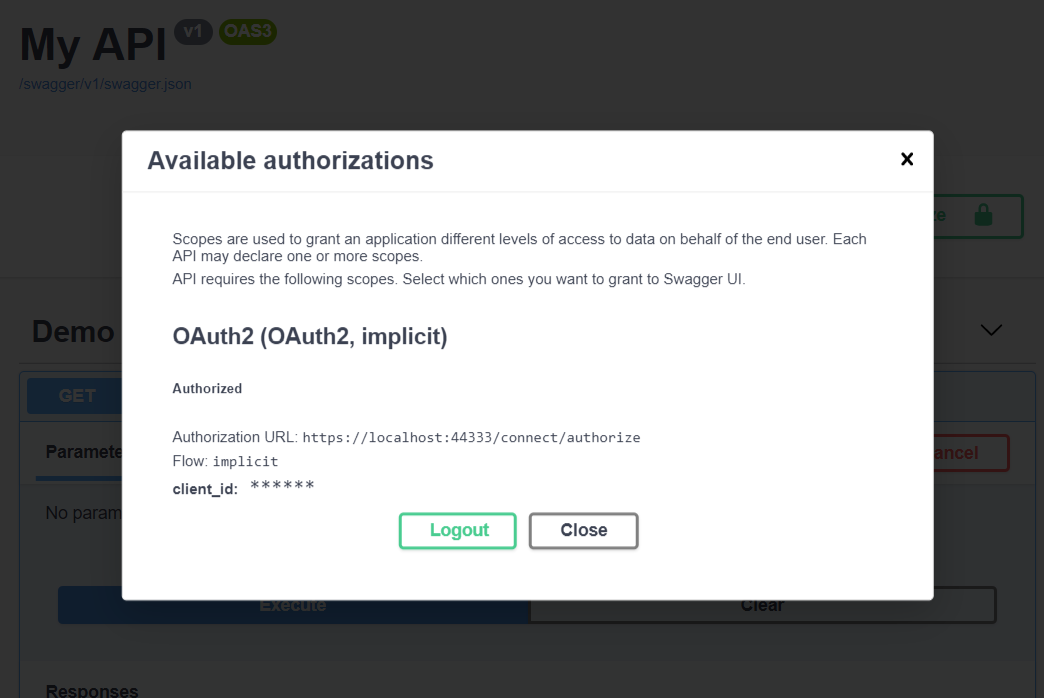
After successfull authorization, we get 200 status code response from API actions.
GitHub source code: https://github.com/Talentech/SwaggerIdentityServer4Example
Author: Tomasz Margalski